Feeds:
Posts
Comments

Archive for the ‘tips’ Category

The body speaks volumes in small nuances of positioning. I often will pose people standing as well as sitting.  The skeleton provides the framework for the body. A sitting position will naturally bend limbs like arms and legs. A limb that is bent also provides visual interest since it is less static.

If you ask a person to sit, s/he feels like they are “doing something.” Yet this helps them relax. More often than not, a relaxed subject will allow you to “see” into their persona. This makes for a better portrait.

If there is a height disparity in subjects (2 people in the scene/frame) it often alleviates the difference when they are seated.

If you choose to show hands in your portrait (I often do since I feel that hands can help provide storytelling fodder about the subject) make sure you deliberately position them with care. A seated position naturally allows for positioning in a lap rather than dangling arms at the side.

Some people photograph better standing but make sure you try a seated position too. I think you’d be surprised at results. It goes without saying that if you are using studio lighting that you must adjust your lights, but it’s well worth your time to try a seated pose.

Read Full Post »

I have a business type photoshoot coming up this Friday. It’s very conservative depictions. The client and I were discussing attire, makeup etc. I had emailed a few suggestions. May as well post here on my blog. Since I am detail oriented, the list could be longer, but I didn’t want to make it overwhelming.

Suggestions:
Women:
No sleeveless or low cut tops/dresses.
Simple jewelry (large necklaces or earrings can cause unwanted reflections)
No makeup is probably best since we are hiring a makeup artist. She is makeup only, not hair stylist. Bring your own brush to the shoot for touch ups.
Light or clear nail polish. Decals on nails might look fine in person but don’t look so good in photos.
Men:
bring two shirts and two ties
Men should polish shoes.
Both:
Good grooming is important.
Make sure no missing buttons on clothing and it’s pressed.
Please pay attention to nails. Simple manicure. Sometimes this will show up in the shots if hands are shown.
No busy or large patterns.

Read Full Post »

Who ever expected that English 101 would have impact today? Bloggers have taken to their keyboards and mobile devices in massive numbers. Everyone has something to say. I think the English majors have the edge here. Photographers, designers and artists are blogging too, ya know.

I’ve decided to subscribe to the Dictionary.com Word a Day to brush up on my English. It’s easier than sleeping with my dictionary on the night stand. LOL, I actually used to do this because learning is a lifelong quest—my father was a teacher. I love vocabulary but being in visual businesses for so many years has made me rusty in the authoring department. Dictionary.com is in my Bookmarks toolbar to prevent me from looking like a complete babbling idiot. Literacy is suffering with mobile texting. U and 4 et al, but your blog is more permanent than texting. At least you hope so.

The geek in me loves gadgets so yes, I have an iPod Touch. There’s a new application (March 2009) for Dictionary.com for it! For those of you fluent with your iPhone, you won’t be left out. It’s free.

Here

If redundancy is plaguing you, the Thesaurus.com is also included along with Word of the Day. Maybe you can change your habit of reading the back of the cereal box at breakfast.

Sorry, no dissection of speedlights or images today. Just a tip to improve your blog. Better than just pimping pix in vanity displays despite a picture being worth a thousand words or being mute. Sooner or later, you’ll want to write something. Invidious?

Read Full Post »

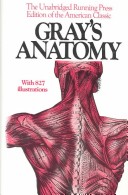
My formal training was for illustration. I had never dreamed that 4 years of figure drawing would help me as a photographer who photographs a lot of people. We did study the textbook Gray’s Anatomy for Artists. graysfcThe human skeleton is the supporting framework for the attached muscles. Skin and clothing cover muscles, lending shape to the form. Viewers will detect in a minute when something drawn doesn’t “look right” in a drawing of the human body but often cannot identify the “why.” Drawings can be telltale, but cameras aren’t supposed to “lie.”

Posing stools vs. chairs
There’s nothing like a great chair as a prop, but what’s all the push for “posing stools” about? Do stools pose themselves?

Simplicity ranks highly in portraiture for the attention on the subject/person.  A person may look entirely different seated than standing. Many people are focused elsewhere when posing for you. A person can be more relaxed if seated so you’ll consider sitting them on something as well as different poses. If there is a great disparity in height and you’re photographing two people, it’s a frequent solution to have them both sit so you can photograph them together as a single subject without interference in composition. Stools take up less space than chairs and you can move your subjects closer together if more than one person.

Sitting can force a person to support their weight on their own structure that is the backbone. Remind them to arch their back slightly and not slump.
Chairs
If you’re using a chair, you’ll notice that the thigh area of the leg will rest on more of the seat portion of the chair. This has a tendency to flatten out the thigh against the surface and make it spread wider. It’s never flattering. Even a skinny thigh can appear wide if pressed. Move the model forward some and allow the lower leg to support more of the weight. If the foot is on the floor, the weight distributes to this endpoint. Chairs are normally a fixed distance seat to floor.

Posing Stools

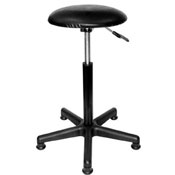
posing-stoolA posing stool has a smaller surface area in the seat. This naturally helps the model resist the temptation to inadvertently rest thighs on the entire seat or slump into the backrest portion like a chair would have. You’ll still need to observe that the person doesn’t find a way to press those thighs against the seat. The adjustable stools for height are good so the model can rest the sole of the foot on the floor. Adjustable stools will accommodate variances in height. Adjust it for the height of the person. Keep them comfortable. If the knee is much higher than where the join of the leg attaches, you’ll need to adjust the seat height upward. You don’t want a person with knees scrunched up unless it’s obviously intentional.

Help the person in front of your camera. They are reliant on you to communicate what you see and to direct them. They will certainly be happier with the end results if you can mention what you see and how to correct it before the shutter release trips.

Read Full Post »

Let’s zoom in to another freebie. 🙂

Scott Kelby and Matt Kloskowski of KelbyTraining.com have a new TV series! If you love shooting Nikon, this is very specific to Nikon users. Manuals only go so far. Episodes are 10-12 minutes so if you have a short attention span, you’ll still be able to digest content. I like both these two as trainers. I’ve read Scott’s books. He’s also used one of my stock images in one of his books. Dang! I hadn’t bought that one.

It’s Nikon D-Town

Brought to you by
NAPP National Association of Photoshop Professionals I’m a member of NAPP and there’s a wealth of benefits to it,  but Nikon D-Town is free.

They’ve detailed some really great stuff.
Digital begets chimping. We don’t just shoot without checking what we’re shooting. I like to see if things are sharp and in focus, and I’ll bet you do too. How many button pushes will get you to 100% magnification? Roughly, six. Six pushes? Yikes.
Supported by the D300, D700, D3 and D3x. D200 is different. Slightly different to set up in the controls menu.

One touch zooms right in. Get to 100% fast when you’re reviewing your images. Secret’s in the Custom Settings menu. I won’t get into details about it, you’ll need to watch it for yourself.
It’s in Episode 2. Set it up and you won’t look back.

This is a weekly show. It’s full of useful tips. Not textbook, but real working type tips. Not only that, but it’s portable. You can subscribe to them as iTunes podcasts. I’ve downloaded the episodes to my iPod Touch. I can watch them at my leisure. Joe McNally stands in too for some live demos with Nikon speedlights. Speedlights—yum! Thanks, guys.

Read Full Post »

Less is more
One of the more challenging things about using Nikon speedlights is that there are few buttons. It does streamline the unit and keep it smaller. Can you imagine if there were a zillion buttons on a huge hulking panel on your speedlight? With fewer buttons, you do end up with pushing them in sequences. It’s like those $7 digital watches with two buttons for setting 25 functions. They are benevolent to give you a 2 inch piece of paper with 4 point type to explain with icons? You’ll figure it out eventually. Or not!

Just a button or few—simplicity
There is a modeling button on the back just where the neck of the speedlight bends. It makes a nice buzzing sound that makes one think that there’s something wrong with the unit. With more and more shooters shooting digital today, it’s just easier to do test shots and chimp to see where those bad shadows find their way into the scene.

Ah, but those little red buttons can help you!
Nikon put that little red test flash button on the back of their speedlights and also on the back of the SU800 Commander unit (technically, orange button). The button allows you to “test” to see if the unit is working. I use it after I load batteries into a speedlight and want to see if I’ve loaded them correctly. Exempt the SU800 because there is no light in it since it’s just a control unit.

Sequential Fun
At most shoots, there’s always a lot going on. Chaos with a dull roar. You might be shooting with multiple speedlight set ups. Try two, three or four. You’ve mounted them and got ’em where you think you want them, channel is set, group assigned. You want to do your test shots, adjust power…

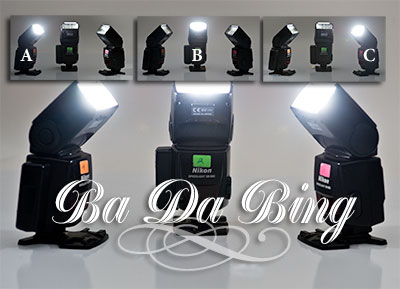
But then… you FORGOT which one you set up in which group? If you’re controlling them with a master on board speedlight or an SU800 controller it’s easy.  Ask them to tell you the group you assigned to them!
badabingblast

How?
Press that test flash button on the back! Presto, BA DA BING.
They will fire in sequence of the group you assigned to them. A, B, C. Right in sweet orderly little solos. Ba Da Bing, we sing. Take notes! You tested them for opera singing, no?

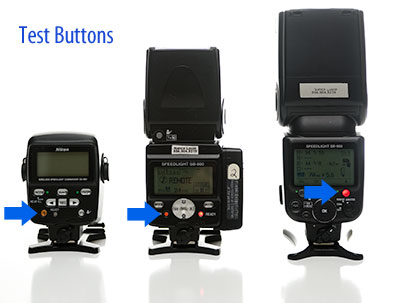
This second image shows you where the magic button lives on an SU800 Controller, SB800 and SB900:
Test buttons

Tony Soprano would be very proud, and he doesn’t sing opera. Actually, Bada Bing was added to the 2003 Oxford English Dictionary due to it becoming such a popular colloquial phrase to mean: an exclamation to emphasize that something will happen “effortlessly and predictably.”  One push of your test button and mystery solved effortlessly.

It’s also good to test them before you start shooting to make sure they are communicating properly. That’s what I tell people instead of letting them know that I have absentmindedly forgotten the speedlight group assignment arrangement.

Watch them sing when you press the button. If your models question why you’re muttering, “Ba Da Bing,” tell ’em nan from Jersey sent ya.

Read Full Post »
Batteries
I use mnemonics all the time. Since I’m a busy person, it really helps. Mnemonics are a way of improving your memory through association. It’s like meeting Mr. White and he happens to be Caucasian. LOL, it wouldn’t work for Mr. Green, but I’d use another mnemonic for him! Good sales people use mnemonics for recall of peoples’ names.

Think positive
If you are a positive thinker, you’d be thinking UP before DOWN right? Who wants to be down all the time to start?  In writing, I don’t think I’ve ever seen down used before up in phraseology.
A seesaw goes up and down. What must go up, must come down. Even Blood Sweat and Tears thought like that.

If you’re loading up a speedlight, you are putting AA batteries into the battery chamber unless you’re using a battery pack. Even so, some of the battery packs use AA size batteries. The Nikon SD-8A does, but I’m not using one. If you are using this pack, let me know about the sequence on it. The newer SD-9 is a 4 or 8 battery array.

batteries preload

It’s fast
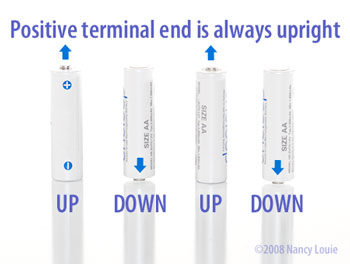
So, if you haven’t noticed, an SB800 and SB900 battery loading chamber has diagrams for correct positioning of the terminal ends. I don’t need to look at them. They always start with UP, so the sequence goes up, down, up, down and the positive end of the battery is always UP to start. It’s got the nub on the top, you can feel it without looking.

Hold the speedlight with the top (lens end) of the speedlight upward. First battery is positive end UP and the sequence follows. UP, DOWN, UP, DOWN.

You should be able to load your batteries blindfolded. Repeat the battery mantra. Mnemonics.
Up, down, up, down. Think positive first and foremost.

Read Full Post »

photo clip stand

Duct tape has many merits, but sometimes you need more finesse.
Do you shoot objects or still life now and then?  Often, we are working alone when we choose to do this kind of shooting.
How do you get  the object  to cooperate and stay in place? I use all kinds of things to help.
I’m fond of found materials so I use what I can find. It’s not unusual for me to use something that was not originally designed to do the task.
There’s plenty of stuff around to do double duty and it doesn’t cost a small fortune.

Stand up!

Standstand angled

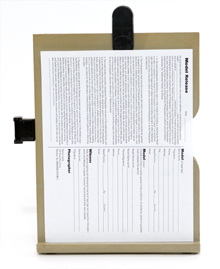
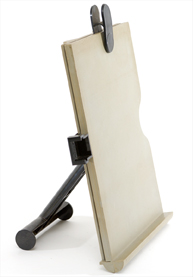
You probably tried taping something to your background to find that doesn’t work very well. I have an old stand that was designed to be used to hold your paper when you keystroke. It works really well for shooting flat things. You just need to be careful in tilting it too much since that can create perspective distortion.

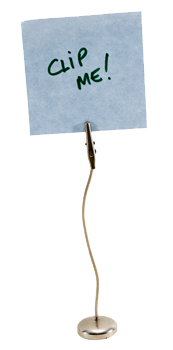
I also have a tiny decorative stand that looks like it  has  an alligator clip on the end. The original intention for this thing was to hold a picture for display. I found it at Target years ago.  Hmmm, it could be pressed into service for things other than photography 😉
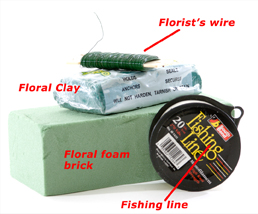
It works well for holding small objects. It’s free standing. There’s also florist’s clay and styrofoam blocks that can help you out. You can stick a popsicle stick in it to prop something upright.

72floralclay6170

Stuck up!
Next, I rely on adhesives. Magic Tape that can be stuck on the back of something but removed later without a trace. Many of the craft stores also carry this sticky stuff that looks like small white blocks. You can use that to adhere something to itself, a backdrop or preventing an object from rolling. How many times have you shot something and it rolled off the table? Eh?

Hung up!
Last but not least is florist’s green wire. It’s easy to wrap around something and stays in its place afterward. I also like to use fishing line to hang things or attach.
Easier to Photoshop out after I’m done. 10 lb. test works good. 20 lb. test is what’s shown in the photo. 10 lb. test works fine in most cases.

Shooting static objects often requires good composition skills. Once you set something up, you don’t want it to shift out of position. I use a tripod when I shoot objects, but they will slip out of place the minute I return to look through the viewfinder. Murphy’s Law.

Keep your eyes open and think out of the box. You may have items around your house to put to good use beyond their original use.

Read Full Post »