Feeds:
Posts
Comments

Posts Tagged ‘tips’

The body speaks volumes in small nuances of positioning. I often will pose people standing as well as sitting.  The skeleton provides the framework for the body. A sitting position will naturally bend limbs like arms and legs. A limb that is bent also provides visual interest since it is less static.

If you ask a person to sit, s/he feels like they are “doing something.” Yet this helps them relax. More often than not, a relaxed subject will allow you to “see” into their persona. This makes for a better portrait.

If there is a height disparity in subjects (2 people in the scene/frame) it often alleviates the difference when they are seated.

If you choose to show hands in your portrait (I often do since I feel that hands can help provide storytelling fodder about the subject) make sure you deliberately position them with care. A seated position naturally allows for positioning in a lap rather than dangling arms at the side.

Some people photograph better standing but make sure you try a seated position too. I think you’d be surprised at results. It goes without saying that if you are using studio lighting that you must adjust your lights, but it’s well worth your time to try a seated pose.

Read Full Post »

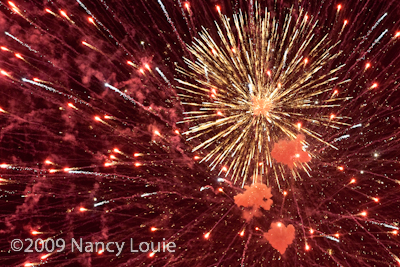
I’d wandered out to view a local fireworks display over the Fourth of July celebration weekend. I didn’t expect to shoot but brought my camera along anyway.

fireworks8636

I ended up doing a bit of guessing what my settings would be and hadn’t done any homework beforehand. Looks like ISO 2500, f/4 — f/6.3 with shutter speeds of between 125 and 250 worked out with burst mode of 5 frames per second.

I went to Lexar’s site for their Image Rescue recovery software to help steer a friend in trying to recovering some images on her Lexar Pro card. Lo and behold, there are some suggestions for shooting fireworks.

Lexar has a free section of Tips and Lessons here. There are sections addressing both Technical and Subject areas of photography and Technical Lessons. There is also a collection of videos that cover some aspects of Lightroom and Photoshop.

Read Full Post »

I have a business type photoshoot coming up this Friday. It’s very conservative depictions. The client and I were discussing attire, makeup etc. I had emailed a few suggestions. May as well post here on my blog. Since I am detail oriented, the list could be longer, but I didn’t want to make it overwhelming.

Suggestions:
Women:
No sleeveless or low cut tops/dresses.
Simple jewelry (large necklaces or earrings can cause unwanted reflections)
No makeup is probably best since we are hiring a makeup artist. She is makeup only, not hair stylist. Bring your own brush to the shoot for touch ups.
Light or clear nail polish. Decals on nails might look fine in person but don’t look so good in photos.
Men:
bring two shirts and two ties
Men should polish shoes.
Both:
Good grooming is important.
Make sure no missing buttons on clothing and it’s pressed.
Please pay attention to nails. Simple manicure. Sometimes this will show up in the shots if hands are shown.
No busy or large patterns.

Read Full Post »

Let’s zoom in to another freebie. 🙂

Scott Kelby and Matt Kloskowski of KelbyTraining.com have a new TV series! If you love shooting Nikon, this is very specific to Nikon users. Manuals only go so far. Episodes are 10-12 minutes so if you have a short attention span, you’ll still be able to digest content. I like both these two as trainers. I’ve read Scott’s books. He’s also used one of my stock images in one of his books. Dang! I hadn’t bought that one.

It’s Nikon D-Town

Brought to you by
NAPP National Association of Photoshop Professionals I’m a member of NAPP and there’s a wealth of benefits to it,  but Nikon D-Town is free.

They’ve detailed some really great stuff.
Digital begets chimping. We don’t just shoot without checking what we’re shooting. I like to see if things are sharp and in focus, and I’ll bet you do too. How many button pushes will get you to 100% magnification? Roughly, six. Six pushes? Yikes.
Supported by the D300, D700, D3 and D3x. D200 is different. Slightly different to set up in the controls menu.

One touch zooms right in. Get to 100% fast when you’re reviewing your images. Secret’s in the Custom Settings menu. I won’t get into details about it, you’ll need to watch it for yourself.
It’s in Episode 2. Set it up and you won’t look back.

This is a weekly show. It’s full of useful tips. Not textbook, but real working type tips. Not only that, but it’s portable. You can subscribe to them as iTunes podcasts. I’ve downloaded the episodes to my iPod Touch. I can watch them at my leisure. Joe McNally stands in too for some live demos with Nikon speedlights. Speedlights—yum! Thanks, guys.

Read Full Post »

Less is more
One of the more challenging things about using Nikon speedlights is that there are few buttons. It does streamline the unit and keep it smaller. Can you imagine if there were a zillion buttons on a huge hulking panel on your speedlight? With fewer buttons, you do end up with pushing them in sequences. It’s like those $7 digital watches with two buttons for setting 25 functions. They are benevolent to give you a 2 inch piece of paper with 4 point type to explain with icons? You’ll figure it out eventually. Or not!

Just a button or few—simplicity
There is a modeling button on the back just where the neck of the speedlight bends. It makes a nice buzzing sound that makes one think that there’s something wrong with the unit. With more and more shooters shooting digital today, it’s just easier to do test shots and chimp to see where those bad shadows find their way into the scene.

Ah, but those little red buttons can help you!
Nikon put that little red test flash button on the back of their speedlights and also on the back of the SU800 Commander unit (technically, orange button). The button allows you to “test” to see if the unit is working. I use it after I load batteries into a speedlight and want to see if I’ve loaded them correctly. Exempt the SU800 because there is no light in it since it’s just a control unit.

Sequential Fun
At most shoots, there’s always a lot going on. Chaos with a dull roar. You might be shooting with multiple speedlight set ups. Try two, three or four. You’ve mounted them and got ’em where you think you want them, channel is set, group assigned. You want to do your test shots, adjust power…

But then… you FORGOT which one you set up in which group? If you’re controlling them with a master on board speedlight or an SU800 controller it’s easy.  Ask them to tell you the group you assigned to them!
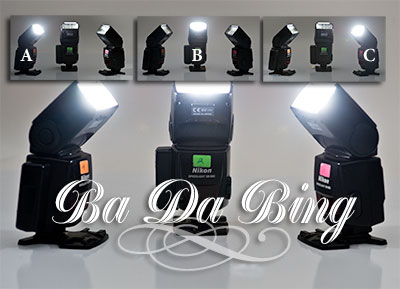
badabingblast

How?
Press that test flash button on the back! Presto, BA DA BING.
They will fire in sequence of the group you assigned to them. A, B, C. Right in sweet orderly little solos. Ba Da Bing, we sing. Take notes! You tested them for opera singing, no?

This second image shows you where the magic button lives on an SU800 Controller, SB800 and SB900:
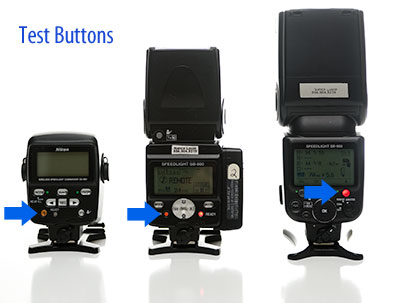
Test buttons

Tony Soprano would be very proud, and he doesn’t sing opera. Actually, Bada Bing was added to the 2003 Oxford English Dictionary due to it becoming such a popular colloquial phrase to mean: an exclamation to emphasize that something will happen “effortlessly and predictably.”  One push of your test button and mystery solved effortlessly.

It’s also good to test them before you start shooting to make sure they are communicating properly. That’s what I tell people instead of letting them know that I have absentmindedly forgotten the speedlight group assignment arrangement.

Watch them sing when you press the button. If your models question why you’re muttering, “Ba Da Bing,” tell ’em nan from Jersey sent ya.

Read Full Post »